Have
trouble installing theme from anitheme? Follow detailed guide below on
how to install theme & skin on the platform you choose.
Windows XP & Windows 7
1. Download UXTheme Multi-Patcher from it official website
here. For Windows 7 user, Install Astyles Theme Patcher. You can download it
here.
2. Just install it on default setting.
It usually will detect your system automatically, and install required
files based on your Windows version, so you don’t have to worry too
much.
3. Restart your PC after installation process finished to fully take effect.
4. Install your desired theme, and you’re good.
Please note that by installing this
application will prevent your Windows interface from being turned into
classic style after installing Visual Style Windows Theme.
Windows 8 & Windows 8.1
1. Download UXTheme Multi-Patcher from it official website
here.
2. Check the option “Use Aero glass transparency hack for windows 8/8.1/10”
3. Restart your PC after installation process finished to fully take effect.
4. Download HUD Evolution
here.
5. Run as administrator if needed. Do installation, and check this option while installing:
6. Create System Restore Point if needed.
7. Download Shell32
here.
8. Run as administrator, install, and follow this option:
9. When a warning message will appear. Just click “No”, and click “Cancel” on Shell32 properties.
10. Restart your system
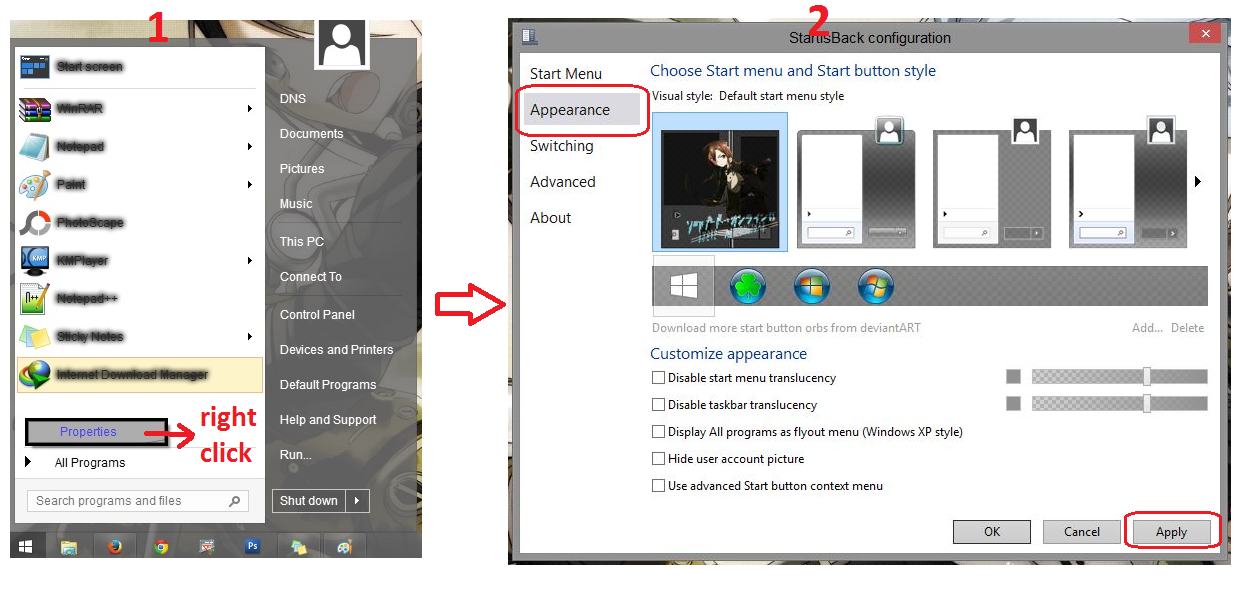
11. Some theme have start menu own style. To use it, you will need to install StartisBack, download
here. Just do default install. Note that by installing this Application will turn your start menu to Windows 7 interface.
Windows 10
1. Download UXTheme Multi-Patcher from it official website
here.
2. Check the option “Use Aero glass transparency hack for windows 8/8.1/10”
3. Restart your PC after installation process finished to fully take effect.
4. Download OldNewExplorer
here, and follow the option like the screenshot below:
5. Download Astyles Theme Patcher
here.
This application can be use remove the status bar and show the
background folder. Do installation, and follow the option like the
screenshot below:
6. Download Uxstyle
here. Choose the version for Windows 10, then do a default installation.
7. Some theme have start menu own style. To use it, you will need to install StartisBack, download
here. Just do default install. Note that by installing this Application will turn your start menu to Windows 7 interface.
AIMP
1. Download any skin you want.
2. Open the .rar file, and then extract to your desired location, for example desktop.
3. Copy the AIMP skin file (.asc3) to
your AIMP skin folder (C:\Program Files (x86)\AIMP3\Skins). The file
type & folder location can be different, depending on your Windows
and AIMP version.
4. Change the skin manually via AIMP.
Note that you can use any older AIMP skin on the latest version on AIMP,
for example if you use AIMP4, you can also install AIMP3 and AIMP2
skin.
Steam
1. Download the skins you want to use.
2. Open the .rar file, and then extract to the location you want.
3. Put the extracted folder to your Steam skins folder (C:\Program Files (x86)\Steam\skins)
4. Open Steam and go to settings > Interface > Skin and choose the skin you want to use
5. Restart your Steam, and your Steam
Skin will change. Please note that Steam sometimes bring updates that
might broke the interface if you are using older theme. Alternatively,
install the latest version of the skin that available.


.jpg)


 kemudian pilih [Settings].