Newest Post

How to use the Theme? [How to use this theme XP]?

| Thursday, July 2, 2015
Read more »

How to use the Theme? [How to use this theme XP]?


Too lazy care brothers understood that looked image

Source: Sola
This post is to guide you to use the XP theme, and am also to give you the possible The solution on the problem like the classic XP skins to change skins, or the folder background will not show. Below guides and solution is what I know, therefore there might, be other sleep better solution in the world wide web, if you know any, please let me know ;)

Shortcut

Guide = Guide
  • Using Anime XP theme XP Theme = Use
    • Without the Installer = With no installation required
    • With Installer = with installation
  • Anime anime LogonUI = user login
  • Right-Click Menu Anime Mouse = use right click
  • Seiyuu System Sound = sound system
Problem = current full error
  • Windows Classic Skin = current image in windowns
  • Folder's Background Image = wallpapers in folders
Solution = fix
  •  use the following tools
  • UXTheme Multi Patcher 6.0
    • Patch
    • Unpatch
  • Enable Folder's Background Image = enable current background image in the folder
Start Here = begin implementation


Anime
Guide Using XP Theme If you download the anime theme xp from sola1412, there is only 2 type, one is with installer and another is without. Both am also very easy to use, will try to share with me the non-installer version, but sometime Due to the rule, the installer phải use. Please read below for the guides continue.

Without Installer


  • after you extract files from 3 compress the file you had to download.
  • The trọng file filename with school the day (for example), the read me is just a file where the source came tell from.
  • What you have to so is copy and paste "school days" file & folder Into the theme folder of you Windows.
    C: \ WINDOWS \ Resources \ Themes

  • After that, execute the "school days.Theme" file (with a paint brush logo).

  • The Display Properties will , just select "Apply or OK", then XP will change của to the theme.
With Installer


  • Execute the installer will prompt for this language option.
  • Select from the list the English, I'm not sure other language is working or not -.- ', then Next.
  • Just select Next if you come across anything USER AGREEMENT Until You Reach this section, it is Important password is inside there.

  • In this case, the password will be "bbs.acgdiy.com" People misunderstand alot and visit site for a password, the password is Actually URL. Copy the password and continue NEXT.
  • When the installer ask you for the password / code or similar thing, you just copy and paste the password. Then NEXT and follow instruction.

  • When it finish it will prompt you install the above section, select the Launch "... XP Theme", and select the FINISH button.
  • The Display Properties will, select OK or Apply and just button, the theme will change.
  • If you know you have not any UXTheme Patch installer, then tick the option Patcher is before select the Finish Button. Patcher guide read at below.
  • If the của XP Windows Classic Theme Skin or nothing happen, then please refer to below solution.
Anime

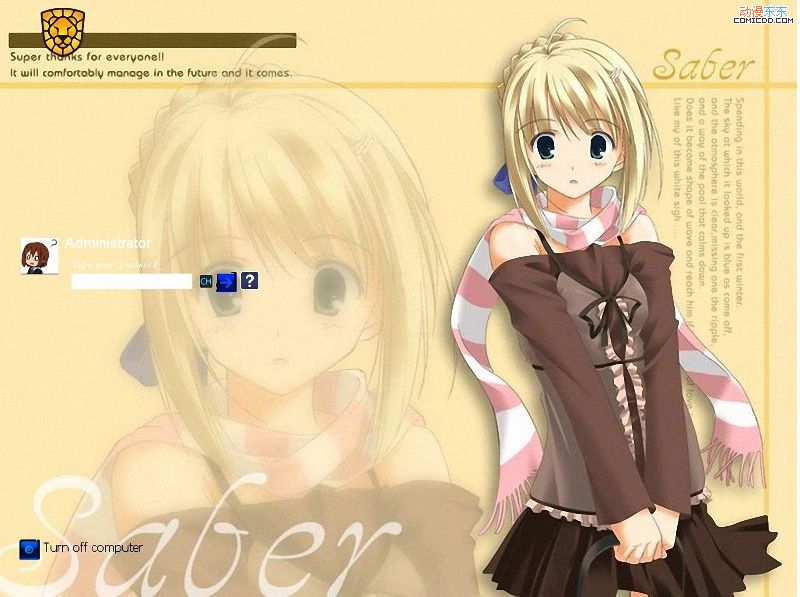
Anime LogonUI XP theme is not limited to only Windows Theme, this is the logon user interface come together with the Theme sometime pack. If it is come with a folder, you need to manually use it, else if it is come together with a installer, then it is automatically sets apply. First thing you need to so is download the LogonUI  replacement tool, any tools , there is plenty of similar tools in the web float. If you lazy to search, just download the one I'm using, get it via link1,  link2.

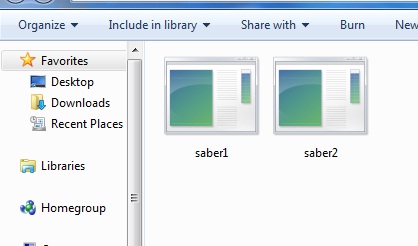
After download, extract and install it. all before I repost, I will put the LogonUI file folder for easy Organize and use. The LogonUI file is Actually in the ".exe" file extension, in above picture is like "saber1.exe", it is not an application, if you double click it, it will not have any effect. To use it, open LogonUI the replacement tool just download and install bạn. Then choose the "Select a file LogonUI ..." button, and select the file Logonui. After the selection, program will prompt you a message like above picture, please be sure you did not select a mà wrong ".exe" file. After that, it is done, and you can close the program.  

Note: Previously, khi I using other similar program to replace the LogonUI file, and I accidently select a installer ".exe" file (wrong file> _ <'), my login session, it a installation process, and I can not log Into Windows anymore :(  . Best solution is the LognUI chia and other files with ".exe" file in the folder. And no matter what program using, please select :) 

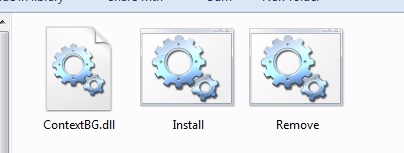
carefully. Mouse Right-Click Menu Some of the theme has also include the mouse right click menu background, enable a display image on the background of the right click menu, just like the above image. come with 3 files in this the folder, for example screenshot above, "ContextBG.dll", "Install", and "Remove", this 3 same file name. In order to use it, just double click on the file with the name of "Install" it will automatically sets enable and use this beautiful bg right click menu. Restart required to take effect sometime. In order to remove it, just double click on the file with the name of "Remove", it will remove this image from the right click menu bg. Restart to take effect sometime required too.  

If there is multiple bg, and you wish to try it all, please remove the current mouse right click menu to use the new PROCEED only another right click menu or bg, or else there will be sometime some problem. Sound System in Anime XP Theme, the author alway using the particular anime OP and ED as the Windows startup music or Windows Exit sound, but using some system sometime by seiyuu voice sound, like the sound like "Empty Recycle Bin "," Windows Maximize "and etc.

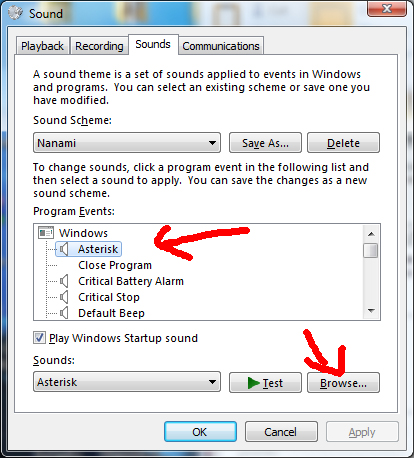
This voice can be found in the Web Easily too. System voice or sound can be Easily replace or change. First thing you need to be sure is the voice or sound file you need to change is in WAV format (Windows only accept wave format). Then you go to your taskbar, right-click the Sound icon (), then select the properties, something like below Windows will pop up. After this Windows pop up, you choose the 2nd has tabs or the Sound tabs (do not follow this screenshot), then you will see something similar like above picture. Just select sound like "Exclamation", "Windows Startup" and etc. then select "Browse" button to select the file you want to change. After just click on the mà "Apply" or "OK" button and you good to go ^^.

Problem This section will look Into the problem after the apply the theme. For example, Classic Skin theme apply the theme, and etc. Windows Windows Classic Skin Skin Skin has turn Into Windows Classic after dùng download anime XP theme, this is Most likely your Windows "uxtheme.dll" not yet use any patch (or crack). Originally, Windows has restrict us to use any unsigned (or third party) theme, therefore this has to be file with Certain software patch, for example like UXTheme MultiPatcher, and etc. Refer to solution UXTheme MultiPatcher 6.0. Folder folder's Background Image Not all background sẽ Displaying the image, the image will only display has những Originally. For example like "My Pictures", "My Music," "My Video", and etc. If there is no background image you use the anime theme khi from những folder I mention, then there is something wrong. Do not panic, you did it not just a option enabled.

The solution will be at the Solution section Further Discuss below. Solution UXTheme Multi Patcher Patcher 6.0 6.0 The UXTheme Multi can be downloaded via here.
Before you PROCEED, please be sure your Windows patcher not yet use any other, expecially from Multi-Patcher UXTheme (not sure on other patcher). If you does, uninstall / unpatch it with the version 6.0 version is before using this, or else there to might have some problem, depend on của luck. This patch is search from the internet, than I am not guarantee mà will not bring any patch this Harmful to your Windows or computer. I will not take any responsibilities fi if Windows crashes or etc. Use it on your own risk :). The worst I encounter is I use anymore không theme vì I patch and unpatch vài time -__- ', just stay in classic skins mà all. Patch




  • After you download the patch, extract and then execute it.

  • After that, this window will be, and select "Patch" button to continue.
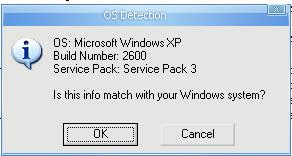
  • Then, the OS Detection windows show up, just select "Ok" button to continue.

  • After that, this windows will to you to see, then "OK" again to continue.

  • At this point, your Windows will windows classic theme skin, the patch is compared it mean work. Follow the instruction, select ok to restart the Windows.
  • After restart, your Windows now shouldnt use any other 3rd part theme.


To unpatch the UXTheme Unpatch Multi Patcher, all you just has to due is to execute the same patch again. Please remember use the same back problem will occur version else. When you unpatch, Windows will classic skin again, just after the restart and it will return to normal. Not recommend to unpatch, if you patch and unpatch time, the uxtheme.dll will spoiled, I encounter it all before use any more theme, classic stay forever. Enable Folder's Background Image


  • Right click on "My Computer", then select "Properties".
  • After "System Properties" show up, select "Advanced" tabs.
  • After that, select the "Settings" under the "Performance".

  • After that, Windows will prompt you the "Performance Options".
  • Under the "Custom", look for the "Use a background image for each folder type".

  • Enable option just like above picture.
  • Then select Apply or OK, and the folder will now display the background image.

End Here

SORRY FOR BAD ENGLISH

How to use the Theme? [How to use this theme XP]?

Posted by : Anonymous
Date :Thursday, July 2, 2015
With 0comments

How to use the Theme win7? How to use win7 theme?

|
Read more »

How to use the Theme win7? How to use win7 theme?


  • Installation = installation
    • Install Theme File = install the profile theme
    • Theme Patch Install the patch to existing = install theme
  • Universal Theme Patcher (x86 / 32-bit) = install pactcher (x86 / 32-bit)
  • Put on the Anime Skin for Windows 7 Theme = made out of anime theme win 7
    • Apply Anime's Theme = applied Anime theme
    • Change the Start Button and Background = change the start button and wallpapers
    • Restore the Start Button and Background = restoring the start button and wallpapers
  • Uninstall the Theme = boot theme
I just care a little severance rest of you can look photos to follow, even if not really do any more time after care measure, the lazy rising


Install the Theme File
Installation Most likely there will be two very similar share file name, like "abc WINDOWS 7 THEME.exe" and "WINDOWS 7 THEME Patch.exe abc". The theme file I refer is the ".exe" file without the "Patch".
  1. Extract the downloaded compressed file bạn have.
  2. Right-click on the "Theme File".
  3.  Select "Run as administrator" and then a window will pop up.
  4. Select "English" in the drop down box and press "Next" to continue.
    It will prompt you the Setup Wizard.
  5. Follow on screen instruction, press "Next" to continue
  6. Select the "I accept agreement".
    Copy (Ctrl + C) is highlighted url.
    Continue with "Next"
  7. Paste (Ctrl + V) the password input box Into
    Continue by pressing the "Next" button.
  8. In this section, you can leave it default (but if it has a weird character, please change to English language or preference).
    Continue by pressing the "Next" button.
  9. Continue press the "Next" button off until you see above picture, continue by pressing the "Install" button.
  10. For now please wait for 20 seconds.
  11. After 20 seconds, then press the "Close" button.
  12. Installation will start now than wait it finish.
    OK now the next step is very Important, please read carefully.
  13. Now got 2 situation, follow the one that apply to you.
     
    • Situation 1
      1. If you have not shaking the "ThemePatcher" or not sure, please check the 1st box.
      2. 2nd Leave unchecked box.
      3. After select "Finish" button.
      4. Continue to the step of "Universal Theme Patcher-x86".

    • Situation 2
      1. If you already shaking the "ThemePatcher", please dot not check the 1st box
      2. 2nd Leave unchecked box.
      3. After select "Finish" button.
      4. Continue to the step of "Install the Theme Patch".
Install the Patch
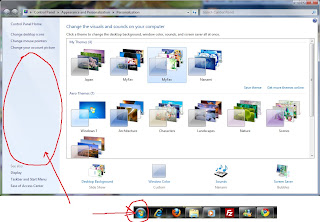
After you install the theme file, you can check under the "Personalization" window, and there is a new theme installed display like below picture The installed theme show you a black background image like above picture, considering what you need to due is to install the "Theme Patch". If after you install the file and it shows you a beautiful background, then you can skip this step. I have mention. So far, the few What I found Windows 7 themes are require to install the patch, I'm not sure what problem, maybe is the path problem, but no worry it is rather easy.


  1. Start the installation by select the filename of the file end with "Patch".
  2. From here follow the on screen instruction, very similar to "Theme File"
    installation. Some patch is requires password and some do not.
    If the require password, please copy it in the user agreement.
  3. After installation is done, please remember to uncheck the checkbox select the "Finish" button (refer to above picture).
  4. Go to Control Panel> Appearance and Personalization> Personalization (or right-click the desktop> Personalize).
  5. Now the "Installed Themes" this nên this look in the Personalization window.
  6. Continue the step of  "Put on the Anime Skin for Windows 7".


Universal Theme Patcher (x86 / 32-bit)
This is similar to the UXTheme patcher of Windows XP, this is just more advanced and more thing. Remember you just has to do it ONCE.
  1. It will prompt you after you finish below Dialog in the setup wizard if you follow the installation step "Situation 1".
  2. Just select language and press "Ok" button.
  3. Just read through in case more.
    Press the "Yes" button to continue.
  4. Here will show you what files need to be patch.
    In my case, I patch all of add.
  5. After you patch all of the files, it will prompt you a window to ask you to restart your computer.
    Just select "Yes" button and restart automatic shouldnt Your Computer, nếu not, please restart it manually.
  6. After restart, then continue the step of "Install the Theme Patch."
    If you already by comparison, go to Anime Skin for Windows 7.


Put on the Anime

Anime Apply
Skin for Windows 7 After you install the theme's theme and am also the theme patch, now you see this thể inside the "Personalization" window.


  1. Go to Control Panel> Appearance and Personalization> Personalization (or right-click the desktop> Personalize).
  2. Select the Kusugawa Sasara theme under the "Installed Themes" section.
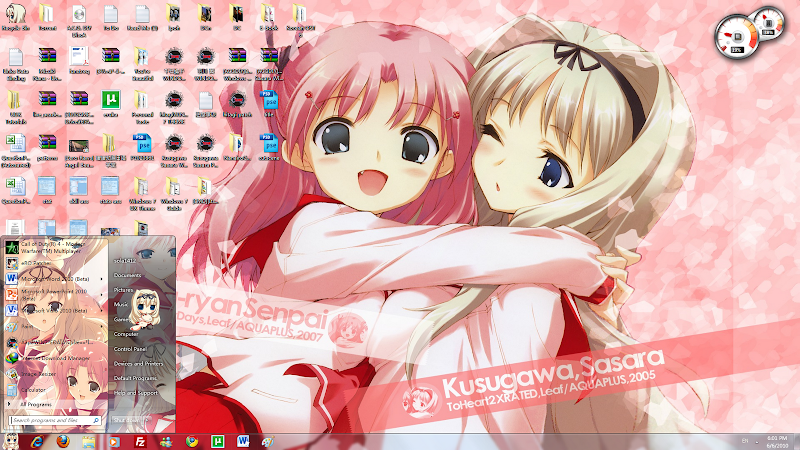
  3. Now your Windows 7 will like this, beautiful.

  4. Although it working since "start menu" background has change, but it still got more Actually.
  5. Some of the themes is change the "Start" button and background Personalization side column.
    For example the theme I use in this tutorial, Sasara Windows 7 Theme.
  6. "Start" button and then continue Personalization background "Start Button and Background" step.

Change the Start Button and Background
Not all the 3rd party Windows 7 anime themes come with the beautiful start button, therefore please see the screenshot That I repost, if the screenshot shows Windows 7 default button can mean you ignore this step. This step is very very Important, please read carefully, or somewhere else to might not work. You can still use the theme, but only the red arrow pointed above area will not have any effect. So let's start.


  1. First go to Start> All Programs> "Kusugawa Sasara WINDOWS 7 THEME".
  2. Right-click on the file "BETA" name in it, select the "Open file location".
  3. After that, a window pops up and the folder 4 files.
  4. If the red circle file (above picture) is missing in this step, you have to reinstall mean.
  5. Next right-click the file name mà "ShellChange".
  6. Select "Run as administrator" (above picture), then it will prompt you another window.
  7. Select the "Install" button above as Shown in the picture.
  8. Then it will prompt you another window to tell you mà restart to take effect Your Computer, but it is in Chinese or weird character. (Above picture).

    • If this window shows you something "Access to the path is denied ...", then it is failed. This did not happen you "Run as administrator".
    • Re-run the file with administrator right again, but I'm not sure it still working or not one of the file is missing now.
    • If still no effect, go to "Restore the Start Button ..." then restart this step again.

  9. Press "OK" button, the picture will mà updated mention another step in 6th "restore" button, nothing much for now just close it. (Above picture)
  10. By now của start button is already updated (above picture).
    So what you need to so is restart Your Computer.
  11. After restart Your Computer, by now của Personalization window will look like this.
  12. Congratulation, it is done!
  13. But what if I want to change it back to the default start button, how?
    Continue "Restore the Start Button" step for more info.

Restore the Start Button and Background
Muốn restore back the start button and the picture background Personalization default back to Windows 7, you need to so sau step, very similar to the previous step. You can ignore this step if you did not apply the "Change the Start Button and Background".
  1. Go to Start> All Programs> "Kusugawa Sasara WINDOWS 7 THEME".
  2. Right-click on the file "BETA" name in it, select the "Open file location".
  3. After that, a window will popup and the folder has shouldnt 3 files.
  4. Next right-click the file name mà "ShellChange".
  5. Select "Run as administrator", then it will prompt you another window.
  6. Then select the "Restore" button.
  7. Another window pops up to tell you and ask you to successfully restore restart to take effect Your Computer.
  8. At the same time it will create a file at the desktop. For now, just the first restart Your Computer.
  9. After restarting you system, right-click the file created mention. (Refer to below picture)
  10. Select "Run as administrator" and it will prompt you a window.
  11. This function is to clean Certain file / folder, just press the button and wait for a while.
  12. Then another window pop up to inform you it has removed the files, then press ok.
  13. You can delete this file and all done.


Uninstall the Theme
Muốn uninstall the Windows 7 theme anime, please be sure you have already done this step ("Restore the Start button ..."). Then continue below to learn how to uninstall the theme.
  1. First, change back to other theme is before uninstall first.
  2. You can go to Personalization and change it back to any default or other của favorite theme.
  3. Go to Start> All Programs> "Kusugawa Sasara WINDOWS 7 THEME".
  4. Select the "uninstalled Kusugawa Sasara WINDOWS 7 THEME".
    If it has two folders, print "WINDOWS 7 THEME Kusugawa Sasara" case, remove the One That end with name of "Path" first, then only remove the original one.
  5. Then follow on screen instruction.
  6. Done!


  The purpose of this post is to teach you to use the 3rd party anime theme of Windows 7 That I share here, and if there is any new changes later on the installation, I will update here as well. Anyway, please read carefully and follow all the step below, or else the theme of might not work I know my English is bad and broken, than please bear with it ;). 
 
Taegukgi  
purpose of this article is to guide you to use the full win 7 theme which I share here and if there are any new change when installed, I will add to this article below. Please read the truth carefully and follow step by step guide that I otherwise would not like me presents, I know my english is quite the othe, so let sympathy for me, please 
 
This tutorial is only tested on Windows 7 x86 (32-bit) system, and I use it on Windows 7 Ultimate version with language pack installed, not sure will work or not other version. This tutorial I use WINDOWS 7 THEME Kusugawa Sasara as example, but other theme is more or less the same than be flexible;).
 Lastly, I will not take any responsible if your Windows 7 crash, or data lost after you use the theme whatsoever , the patcher for this tutorial UXTheme. So use it at your own risk.

Taegukgi This tutorial using win 7 x86 system (32 bit), and I use win 7 version, but you use windows 7 version, I'm not sure as I have not, in the direction This leads me to remove the object "test" is the theme Kusugawa Sasara WINDOWS 7, however the others can install other themes this.  
 
Finally, I will not take any responsibility if your win7 corrupted or lost data, or any errors when installing the theme, or UTXTheme Patcher and guidelines. So take into consideration when using. (Say like that, but his follow contestants 10 lives and damaged rolls dc win).
  1. Theme downloaded to any Table of Content = Content

 
Next Prev
▲Top▲